Yan Brunshteyn is product manager for Krausz. Avi Chiproot is vice president of engineering for Krausz. Brunshteyn and Chiproot can be reached at [email protected].
undefinedThe flat gasket repair clamp is often seen as a jack-of-all-trades repair product for fixing pipe. No matter what repair crews find in the ground, there is seemingly no repair that a clamp cannot fix. A pipe has a hole or a crack? Pipes need to be coupled? There is a shear break? A clamp will do the job.
In this first part of a two-part series, we will look at when it is appropriate to use repair clamps, and how to properly use and install them. We will also look at common ways repair clamps are misused, and why these applications should be avoided. To gain a deeper understanding of the subject, you should first review the clamp’s flat gasket technology and its limitations.
The Limitations of Clamps
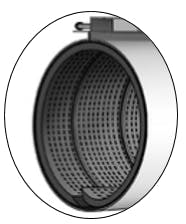
The repair clamp uses a single waffle gasket with tapered ends. The gasket is installed inside the clamp such that one lip of the gasket overlaps the second lip to create a uniform seal (see image above).
To work properly, the repair clamp requires the application of internal and external loads. Installers provide the external load by torqueing the lug and bolting system, and the opposing (internal) load is provided by the pipe itself.
The clamp’s “wraparound” closing system requires that there is enough pipe surface area at the tapered section of the gasket to provide the internal load. Otherwise, the internal tapered portion of the gasket will loosen, creating an exit point for water to leak.
The repair clamp is an effective commodity product when used properly for a given number of applications. Some typical applications listed in repair clamp brochures include coupling plain ends, coupling deflected or misaligned pipes, and repairing shear breaks, longitudinal cracks, holes or pitting. Unfortunately, clamps often are used in applications beyond their limits.
Many see the repair clamp as a temporary and inexpensive solution for serious pipe breaks, while others believe that recurring replacement of repair clamps is a regular occurrence. Others see no issue using repair clamps and believe that because they have always done it this way, it is fine. If not recognized, however, these practices lead to recurring pipe damage, water loss and higher costs.
Inflated expectations of how clamps can repair pipes have led end-users to adopt a wide array of habits—some good, others bad and some just plain ugly.
The Good: Repairing Longitudinal Cracks, Holes & Pitting
Cracks, holes and pitting can all be repaired with a flat gasket clamp if proper precautions are followed and the repair clamp’s capacity is carefully considered.
Repairing Cracks. Use a chop saw to make a vertical cut or drill into the pipe at the ends of the crack to prevent it from further expanding. Use the industry-accepted 6-in. rule to determine proper clamp length. Install a repair clamp that is at least 6 in. longer than the crack’s length, and center the clamp on the crack. Install the clamp so that the tapered section of the clamp’s gasket (i.e. where the gasket meets to close around the pipe) is on the side of the pipe opposite the crack.
Repairing Holes. Use the 6-in. rule again to determine the right clamp length so that the total length is at least 6 in. longer than the length of the hole. Make sure the tapered section of the clamp’s gasket is on the side of the pipe opposite the hole. This is a greater concern for holes compared to cracks because there is no internal load at the location of the hole.
If the clamp is installed with the tapered section over the hole, the clamp may leak. It might not happen immediately—however, with a small amount of ground movement, temperature or other condition changes, the tapered section will open and water will escape. This is one of the limitations of flat-gasket technology in repair clamps, and everyone from the installer to the pipeline design engineer needs to be aware of this.
Repairing Pitting. Use the 6-in. rule and make sure that the gasket’s tapered section is not over the pitted area of the pipe. This also requires that the length of the clamp is at least 6 in. longer than the longitudinal span of the pitting.
The Bad: Repairing Shear Breaks
As mentioned previously, the capacity of repair clamps often is overestimated. Repair clamps frequently are used to permanently repair shear breaks, as shown below.
Shear breaks often are caused by ground movements or other bending forces exerted on the pipe. Repairing shear breaks using clamps may work with initial installation as the piping is still held in place. When these external forces continue after the repair clamp is installed, however, it will cause the two sections of pipe to separate, breaking the clamp’s thin waffle gasket and causing the pipe to leak.
The Ugly: Coupling Plain End Pipes & Deflected or Misaligned Pipes
These repairs are when clamps’ functionality is pushed beyond its limit. Like shear breaks, these fractures as shown above are the result of ground movement or other forces acting on the pipe. Repair clamps are never the proper solution for these breaks, and won’t last. They simply cannot protect the pipe against external forces and the clamp will eventually give way for leaks to occur.
Bell joint and Sleeve joint breaks. Bell joint and sleeve joint breaks often are repaired by cutting out the joint portion and using a coupling to repair the connection (shown below). In both cases, it definitely is “ugly” to use a flat-gasket clamp as a repair solution.
Inflated expectations of how clamps can repair pipes have led to them being used in ways that were not originally intended. It can be tempting to use repair clamps to repair all kinds of breaks, given their relatively low price. Their use in “bad” and “ugly” situations is sometimes encouraged by manufacturers to enhance sales. While repair clamps are completely appropriate to repair cracks, holes and pitting, using clamps to repair shear breaks and plain end coupling will not last in the long term.
In the next article of this two-part series, we will look at solutions for the “bad” and “ugly” application of clamps. Once the industry recognizes that proper and permanent solutions exist, it surely will begin to adopt such practices.

